Showing posts with label Comment. Show all posts
Showing posts with label Comment. Show all posts
Customize comments in blogger
In this post we will discuss about customizing the default comment system in blogger. This customization can be done with help of CSS code. This CSS code changes your old comment system design into completely new and attractive design. Adding this custom comment box design to blogger very easy. It can be integrated into your blog in just few minutes. You can also easily customize this design according to your blog`s design. It will match your blog`s color scheme perfectly.

Why you need to customize default blogger comment system ?
Default blogger comment system is not very attractive. It has very old and dull design which looks very ugly on any blog. so to get rid of this ugly and old design you need customize your comment system. Moreover a good comment system also helps in attracting your blog visitors towards it.
How to Customize comment box in blogger ?
- Log in to your blogger dashboard.
- Select your blog.
- Select Template option.
- Click Edit HTML option.
- Find following piece of code in template code.
]]></b:skin>
- Paste following code just above it and save the template.
- Open your blog to see the new changes
Code for custom comment system
.comments h4
{
color:#ffffff;
display: inline-block !important;
background:#3BB7D9;
padding:10px;
}
.comments .comment .comment-actions a {
background:#3BB7D9;
border-radius: 5px;
color: #ffffff;
font:12px georgia;
margin-right: 8px;
padding:5px;
text-decoration: none !important;

}

.comments .comment-block {

background:#f8f8f8;
border: 1px solid #f0f0f0;
padding: 10px;

}
.continue
{
border-top:none !important;
}
.continue a {
background:#3BB7D9;
border: 1px solid #3BB7D9;
border-radius:5px;
color: #ffffff;
display: inline-block !important;
margin-top: 8px;
padding:5px;
text-decoration: none !important;
font:12px georgia ,arial;
}


.comment-header a {

color: #222222 !important;

}

#comments .avatar-image-container img {
border:2px solid #f0f0f0;

border-radius: 50px 50px 50px 50px;
height: 58px;
max-width: 58px;

}

.comments .avatar-image-container {
border: 2px solid #FFFFFF;
border-radius: 34px 34px 34px 34px;
box-shadow: 1px 1px 3px #dcdcdc;
float: left;
margin-left: -20px;
max-height: 61px !important;
overflow: hidden;
width: 61px !important;
}
Note: In the above code change the value of #3BB7D9; with your own choice of color.
Popular Search Keywords: blogger templates,blog templates,Blogging tips,Template design,Online Earning,HTML editing,Tips and Tricks,Earn Money online,Earn from Bangladesh,Online solution,blogger,blogging,blog,blogs,design,wordpress,development.
Add comment counter in blogger
In this post we will discuss about a small CSS trick which displays comment count in your blogger comment system. Default blogger comment system do not has this comment counter for each comment. It just counts the total number of comments but this trick displays comment count with each comment. It also works well with threaded comment systems.

Popular Search Keywords: blogger templates,blog templates,Blogging tips,Template design,Online Earning,HTML editing,Tips and Tricks,Earn Money online,Earn from Bangladesh,Online solution,blogger,blogging,blog,blogs,design,wordpress,development.

Adding comment counter in blogger
- Log in to your blogger dashboard.
- Select your blog.
- Select Template option.
- Click on Edit HTML option.
- In the template code find following code.
]]></b:skin>
- Paste following code just below the searched code and save the template.
- Preview your blog to see the new comment counter in action.
Code for counting blogger comments:
.comment-thread ol {
 counter-reset: countcomments;
 }
 .comment-thread li:before {
 content: counter(countcomments,decimal);
 counter-increment: countcomments;
 float: right;
font-family:verdana, georgia, arial;
 font-size: 16px;
 color: #777777;
 padding-left:11px;
 padding-top:4px;
 background:#ffffff ;
border:1px solid #dcdcdc;
border-radius:10px;
 margin-top:8px;
 margin-left:11px;
 width: 56px;
 height: 40px;
 }
 .comment-thread ol ol {
 counter-reset: contrebasse;
 }
 .comment-thread li li:before {
 content: counter(countcomments,decimal) "." counter(contrebasse,decimal);
 counter-increment: contrebasse;
 float: right;
font-family:verdana, georgia, arial;
 font-size: 16px;
 color: #666666;
 }
Popular Search Keywords: blogger templates,blog templates,Blogging tips,Template design,Online Earning,HTML editing,Tips and Tricks,Earn Money online,Earn from Bangladesh,Online solution,blogger,blogging,blog,blogs,design,wordpress,development.
Add intense debate comment system to blogger
Comment system is the main component of any blog or website. By using comment system blog users can interact with the owner of the blog. Commentators can also create small discussion threads among each other or with blog owner using the comment system. Blogger blogs has their own default comment system which is good but not the best . If you are the one who don`t want the blogger`s default comment system in your blog then you are at the right place. This post is about adding intense debate comment system to blogger blogs.
What is intense Debate comment system ?
Intense Debate is a powerful and feature rich comment system. It is available for various blogging platforms like blogger, wordpress and tubmlr. It provides flexible environment to commentators while commenting on the blogs.This comment system provides lots of options for its administrators and commentators both. By using this commentators can comment with their social accounts, intense debate account or even as guests without any account. It also provides advanced comment moderation facilities to the administrators.
Features of Intense Debate comment system :
1. Threaded comments
One user can directly reply to the comments of other users by just clicking a reply button . This feature helps in creating a small discussions among the commentators on your blog. Which results in better engagement among your blog and its users.
2. Email Notifications
It provides email notifications when somebody comments on your blog posts. So there is no need to visit the posts again and again to check for the new comments. Whenever there is a new comment available it automatically informs the admin through the email notifications.
3. Comment moderation
It provides very powerful comment moderation policies. You can moderate and reply comments through your email also. You can set a banned keyword for your comments. All the comments having that banned keyword in them will be deleted automatically.
4. Comment voting
Comment voting is another exciting feature of this comment system. Commentators can vote the comments of each other with positive or negative rating. The comments with higher positive rating will be displayed in the first position.
5. Social profile comments
Commentator can also use their social profiles for commenting on your blog posts. If somebody wants to comment even without an account then there is an option named as guest comments. By using this option user can comment without having an account on any social network or on intense debate itself.

Part 1: Creating backup of your template
Note : This backup file is required during the installation of the intense debate comment system to your blog so do not skip this step.
1. Log in to your blogger dashboard.
2. Select your blog in which you want to install new comment system.
3. Select Template option.
4. Click on Backup/Restore option in the top right corner of the current page.
5. A pop up screen will appear.
6. Click Download option.

7. Save the template`s backup file to a safe location.
8. This backup file will be used in the 2nd part of the tutorial.
9. Now head to 2nd part of the tutorial.
Part 2 : Adding IntenseDebate Comment system to your blogger blog
1. Visit intensedebate website.
2. Select Installing option from the left side vertical menu.

3. After that select Install IntenseDebate Now option.

4. At next page fill the required details in the form.
5. Select I want to install IntenseDebate on my blog or website option.
6. Click Sign Up option.

7. Now go to your email inbox and click the verification message sent by intense debate.
8. After it Verification successful message will appear.
9. Click on Continue with your installation option.

10. Now fill your blog address in the given box and click Next step option

11. In the next page select All new posts (Recommended) option.
12. Click Browse button and select the template`s backup file created in Part 1 of the tutorial.
13. Click on Upload file & Continue option.

14. At next page copy the code displayed in a small box.

15. Now go to your blogger Dashboard again.
16. Select your blog whose backup was created in 1st part of tutorial.
17. Select Template option.
18. Click Edit HTML option.
19. In the Template editor Window Press CTRL + A to select all the code.

20. After selecting complete code press CTRL + V to paste the code copied from the intense debate website.
21. Save the template and you are done.
Popular Search Keywords: blogger templates,blog templates,Blogging tips,Template design,Online Earning,HTML editing,Tips and Tricks,Earn Money online,Earn from Bangladesh,Online solution,blogger,blogging,blog,blogs,design,wordpress,development.
Popular Search Keywords: blogger templates,blog templates,Blogging tips,Template design,Online Earning,HTML editing,Tips and Tricks,Earn Money online,Earn from Bangladesh,Online solution,blogger,blogging,blog,blogs,design,wordpress,development.
How to Earn from Comment System?
Which comment system have you implemented in your blog? Are you monetizing your comment system? If no! Then it can be the part of your revenue stream. Disqus makes it possible to earn from comment system on your blog. It works perfectly well along with your regular advertisements. Let’s have a look of this another type of revenue system.

Disqus is a leading comment system on internet. Thousands of web masters have implemented this comment system on their blogs and websites. Disqus provides healthy environment for the discussions between readers, web masters and moderators. It took an important step last year by offering web masters an opportunity to earn extra money. Disqus revenue system works along side it’s comment system.
Whenever a reader opens an article having the Disqus comment system, Disqus shows related content on your blog, website along with promoted articles around the web beside its comment system. Disqus call it Promoted Discovery.
Promoted Discovery to Earn from Comment System
Open an account on Disqus and install its comment system on your blog, website. When you start using Disqus to power comments on your blog, you can start to use it as a revenue stream. Login to disqus.com. Click on the name of your site on Disqus Dashboard where you want to implement Promoted Discovery. Open Disqus Settings for that site.
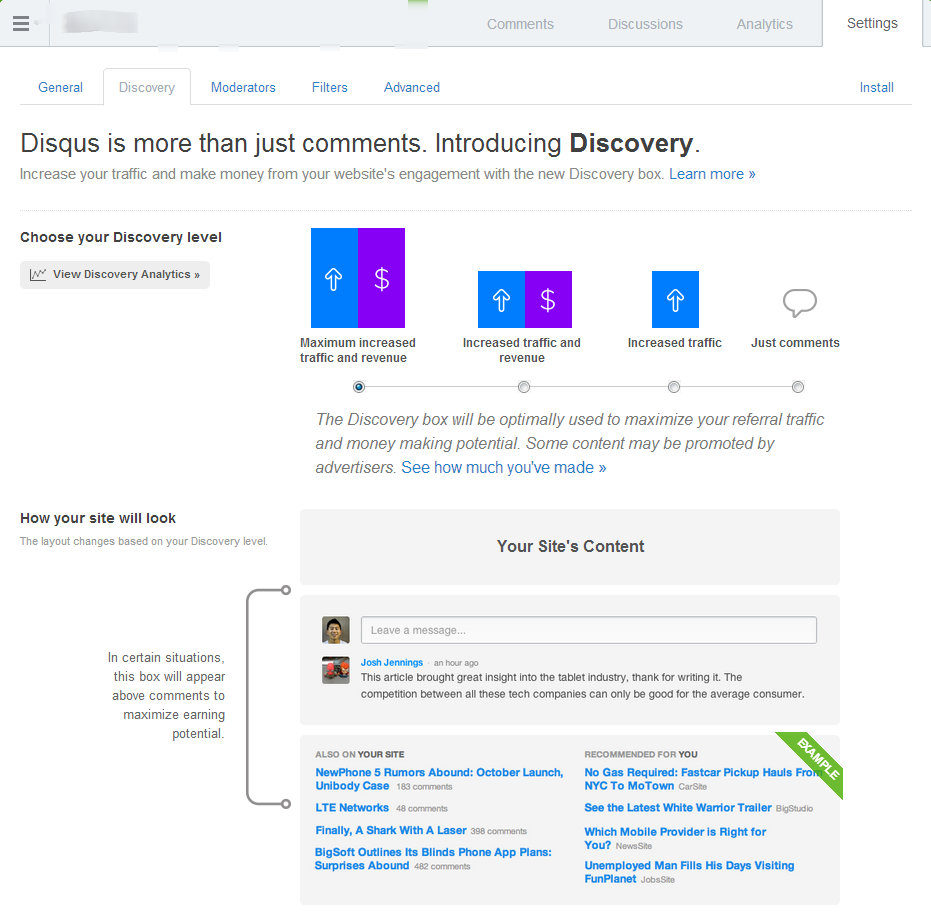
Disqus for Maximum Increased Traffic and Revenue.
Promoted content works along with recommended content on your site. You can choose your Discovery level. Maximum increased traffic and revenue helps to maximize referral traffic and money making potential. Discovery box may appear above or below comments in this case.
You can check the revenue you earned with promoted discovery in the Analytics section. Set up or update your payment method to receive your Payments. You can withdraw your money via Paypal once you accumulate minimum $100 in Disqus Account. Promoted Discovery is a good way to earn additional revenue without managing the layout of your site for advertising space.
Popular Search Keywords: blogger templates,blog templates,Blogging tips,Template design,Online Earning,HTML editing,Tips and Tricks,Earn Money online,Earn from Bangladesh,Online solution,blogger,blogging,blog,blogs,design,wordpress,development.
Popular Search Keywords: blogger templates,blog templates,Blogging tips,Template design,Online Earning,HTML editing,Tips and Tricks,Earn Money online,Earn from Bangladesh,Online solution,blogger,blogging,blog,blogs,design,wordpress,development.
Subscribe to:
Posts (Atom)


